usosvc, What is it in Windows 11 and how to disable it?
Microsoft’s Windows 11 comes with many tools and apps to take complete control of the system. If you are a pro-user of Windows 11, you must know about the tools you can use to boost your productivity.
When using the new features, Windows often releases new software updates to bring new features and remove bugs and other vulnerabilities from the system. To handle such updates, Windows offers a tool called Update Orchestrator Service.
What is usosvc in Windows? How to disable usosvc? All the other frequently asked questions are explained in this guide.
Disable it[TRY AT YOUR OWN RISK], by using WUB
Or rename these by adding the .disabled
After searching for USOSVC in below folder.
\Windows\System32\
- UsoSvc.dll.disabled
- WaaSMedicSvc.dll.disabled
- wuaueng.dll.disabled
What is Update Orchestrator Service?
Update Orchestrator Service is a tool that handles Windows updates. The service handles all the new updates to your PC system, from downloading the updates to installing them. It also verifies every single update before it gets installed on the PC.
It is an essential tool to keep your PC system up-to-date with the latest software updates and other updates. However, in some cases, this tool creates issues. For that reason, many users want to disable usosvc, i.e., update the orchestrator service in their system.
If you are facing issues with automatic Windows updates, try disabling this tool to resolve them.
Why do you want to disable usosvc?
Windows runs many programs in the background. When you look into the Task Manager, you can notice unusual apps and programs that use many resources in the system, resulting in high CPU usage. High CPU usage reduces your productivity. Or there might be a new update downloading and installing in the background through the enabled Update Orchestrator Service.
You must disable this service when not in use to stop such background activities. When you disable usosvc, you will notice that the CPU usage is reduced, and you will be able to run the system smoothly. It is not advised to disable Update Orchestrator Service as it keeps your PC system updated.
However, there comes a time when you are left with only one option besides turning off this service. Let’s find out how you can disable usosvc on your Windows 11.
How to disable usosvc in Windows 11?
Update Orchestrator Service is responsible for managing the latest Windows updates. Upon disabling it, you won’t get any new software updates on your PC.
However, you can re-enable this service to receive the new updates like before. Here’s the tutorial to disable usosvc in Windows 11.
Step 1: Open Windows Menu
To open the Windows menu, right-click the start button from the lower left corner.
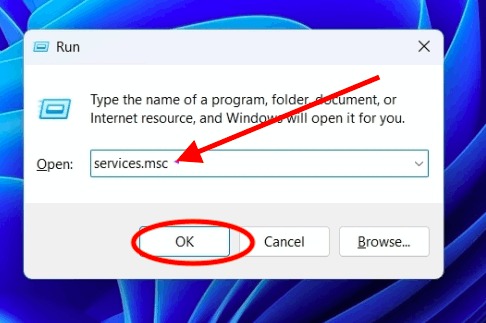
Step 2: Select the Run option
From the Windows menu, select the Run option to launch the Run window on your PC.
Step 3: Open Windows Services Manager
In the Run window’s search field, type in services.msc and click the Enter button. Windows Services Manager will pop up on your screen.

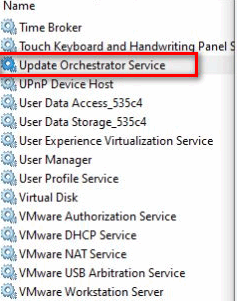
Step 4: Select Update Orchestrator Services
From the Windows Services Manager, select the Update Orchestrator Services option.

Step 5: Temporary Stop usosvc
Right-click the Update Orchestrator Services option and select the Stop button to disable this service temporarily.
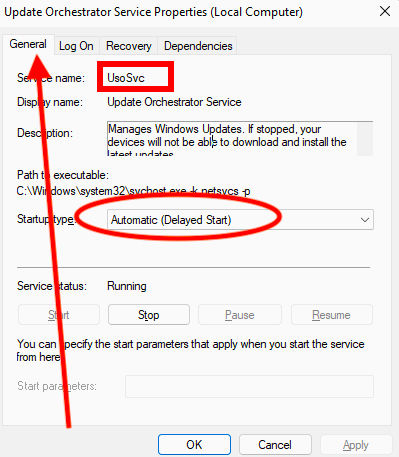
That is how you can disable usosvc on your Windows 11 system. If you are planning to disable this service permanently, you can’t as it is set to automatic by default. To check it, right-click the Update Orchestrator Services option and select the Properties option.
Go to the Startup type in the Properties menu of the Update Orchestrator Services. You will notice that the Automatic (Delayed Start) option is not clickable; it is greyed out.

You cannot disable this option permanently. When you select the stop option, the service will be stopped temporarily. The service will start itself upon restarting your PC.
Frequently Asked Questions:
How can CPU usage be reduced without disabling usosvc?
Update Orchestrator Service is essential for every Windows user. The service brings new updates and keeps your system up-to-date. It is best not to disable or stop this service. If you notice high CPU usage due to updates in the background, let the updates get installed properly.
Keep yourself away from using the system while it is updating. It will reduce CPU usage as you are not doing any tasks on the PC. It will take a few minutes to download and install the update; wait for the updates to get installed. Upon completing the process of installing the new updates, restart the PC and start working your tasks.
What if I disable or stop Update Orchestrator Services?
As noted above, you are advised not to stop or disable Update Orchestrator Services as it keeps your Windows system up-to-date with new software updates and removes vulnerabilities.
When you stop this service, there will be no new software updates received by your system. The users will not get to use the Windows default API, i.e., Windows Update Agent.
Can I permanently disable usosvc on Windows 11 without any RISK?
No, you can’t disable Update Orchestrator Services, i.e., usosvc, on a Windows PC, as it is an important service to keep your PC system updated with new Windows updates. The option is set to automatic, and it is not clickable. However, there’s a method to stop the service temporarily as explained above. The service will be enabled when you restart your system.
