Disable Onesyncsvc In Windows 11, Full Tutorial
Every Windows PC comes with many pre-installed apps and tools that we need in our daily lives. Tools and apps such as to-do lists, reminders, notes, emails, etc., are required daily, and we all use these tools. Onesyncsvc is a service related to these daily apps.
Microsoft offers calendars, OneDrive, Windows Mail, Contacts, Microsoft Accounts, and many other tools to simplify our computing life. We need these tools for various reasons. Onesyncsvc is an all-in-one synchronization tool that synchronizes these Microsoft tools over the cloud.
There comes a time when users don’t require auto-synchronization for different reasons. Disabling the Onesyncsvc service on Windows 11 is easy with the given tutorial. Let’s find out the way to disable Onesyncsvc on Windows 11 PCs and Laptops with proper information.
What is Onesyncsvc in Windows?
Onesyncsvc is a built-in tool Microsoft offers for Windows 10 and above PCs, including their branded Surface series laptops. The tool synchronizes Microsoft accounts and other apps and tools provided by Microsoft on multiple devices and PCs.
Onesyncsvc is a helpful tool that keeps us up-to-date with the latest information and other valuable updates through Calendars, Notes, to-do lists and various Microsoft apps, including OneDrive.
How does Onesyncsvc work?
Windows apps work on multiple devices, such as desktops, laptops and Windows-based mobile phones. Now, when you keep the Onesyncsvc app enabled on your desktop, you can change OneDrive, a to-do list or any other Microsoft app. The
The Onesyncsvc app makes the recent changes on your mobile phone or any other Windows device that you are using. . You need not update the information manually on a different device. This way, you can keep up-to-date with the latest information and changes you have made recently on any Microsoft app.
You can disable this tool whenever you feel like not using this app or if you don’t want to keep the information synchronized on Microsoft apps. Disabling Onesyncsvc in Windows 11 PC, Surface Pro and Laptop is explained here!
How to disable Onesyncsvc in Windows?
There are two different methods to disable OneSyncsvc on a Windows PC. One is to disable it temporarily, and the second is to disable this app permanently. OneSyncsvc is a helpful app that you might need in the future. For that, it is recommended to disable the app temporarily. Here’s how you can disable it temporarily.
How do you temporarily disable OneSyncsvc on a Windows PC?
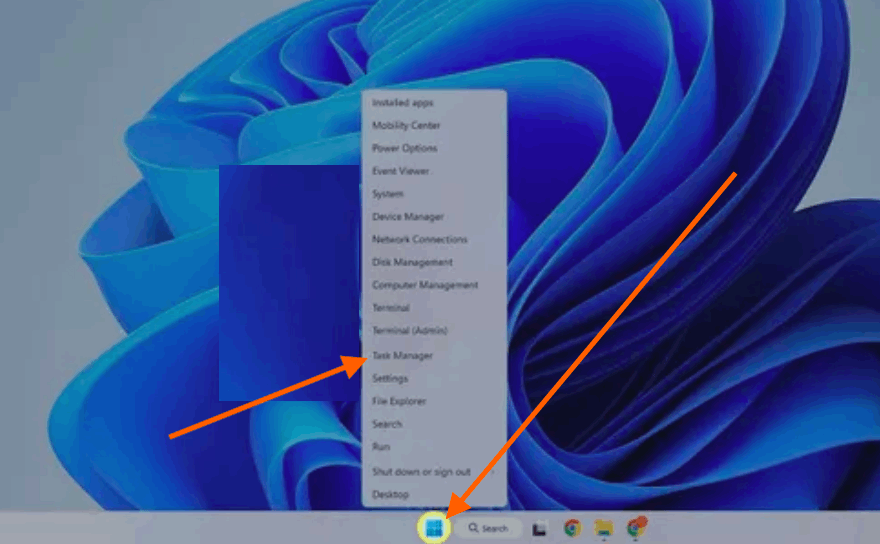
Step 1: Launch the Task Manager app
To do so, hover over your cursor to the taskbar and right-click there. You’ll see a number of options in the given menu from which you need to click the Task Manager app.

Step 2: Select the Services tab
Select the Services tab from the Task Manager’s page from the upper side.
Step 3: Click the OneSyncsvc option
From the services tab, scroll down the page to locate the Onesyncsvc option. Select it out.
Step 4: Right-click to Stop
Right-click the Onesyncsvc option from the given menu and select the Stop option to disable the Onesyncsvc service temporarily.
That’s how you can temporarily disable Onesyncsvc on Windows 11. To disable it permanently on your system, follow the next method.
How to disable Onesyncsvc Permanently on Windows?
Step 1: Launch “Run” box
You can launch the Run box in multiple ways; the easiest way is to press the R and Windows keys. The Run Box will be there on your screen.
Step 2: Open Registry Editor
In the Run dialogue’s search field, type in regedit and click OK. The Registry Editor window will be presented on your screen.
Step 3: Enter the Given Path
In the Registry Editor window, type in the below-given path to locate the Onesyncsvc app.
“HKEY_LOCAL_MACHINE\SYSTEM\CurrentControlSet\Services\OneSyncSvc”

Step 4: Select the Start option
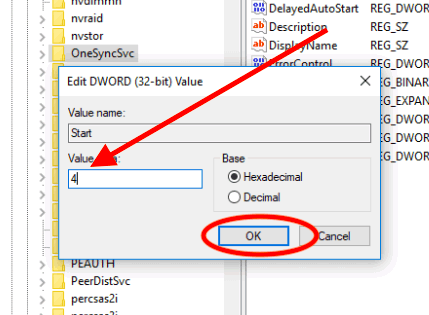
From the right panel of the window, locate the Start option and double-click on it.
Step 5: Change the Value
Here, you have to change the value of the Start option. You’ll see that the current value of the Start option is 2; change it to 4 by manually typing the number.

Step 6: Click the OK button
Finally, click the OK button to make changes to the given value.
Step 7: Restart Your System
Once done, restart your PC to save all the recent changes you have made to your system.
That’s all you must do to disable Onesyncsvc on Windows 11 PC, Surface Pro or Laptop. As noted earlier, Onesyncsvc is a useful service that synchronizes your devices. However, if you don’t want to synchronize things, you have two options: disable this service temporarily or disable it permanently. We have explained both methods using the proper steps above. Please go through the steps to disable it as per your requirements!
