Dosvc Disable Now| 100% Working Method In Windows 11 To Save Your Bandwidth
Microsoft regularly sends out new updates to fix bugs and other potential errors in their operating systems. Windows 11, the most-recent Windows update, receives new updates regularly.
However, the updates and their files create problems while working with high data. For that, you might want to disable dosvc in Windows 11.
What is dosvc? How to disable dosvc in Windows 11? Everything about this handy feature is in this blog!
What is dosvc in Windows 11?
Microsoft introduced the Delivery Optimization service along with Windows 10 to download Windows updates faster. It’s a peer-to-peer service that makes it easier to download Windows updates on the same network faster to save bandwidth.
This feature isn’t required for many users as it creates many problems while working on the computer system. It can even consume high data without the user’s permission, slowing down productivity.
For that reason, many Windows 11 users want to disable this feature. If you are facing issues with Windows’ Delivery Optimization service, here are some basic workarounds for you!
Methods to Disable dosvc in Windows 11
Method 1: Disable dosvc via Settings App
Windows offers a Settings app to configure a PC system and its preferences. Users can change and set many things in their PC systems using this go-to app i.e. Settings app. Here’s how you can disable dosvc using the Settings app on a PC.
Step 1: Open the Settings app
To open the Settings app on your Windows 11 system, press the Windows + I key together, or you can open this app from the main Windows Menu of your system.
Step 2: Open Windows Update
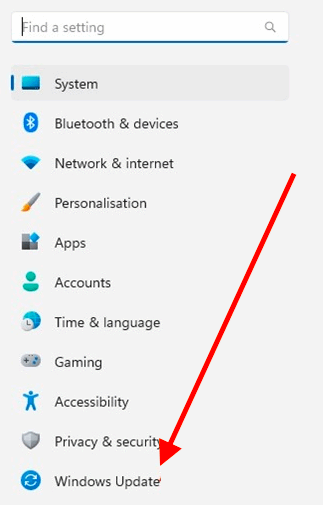
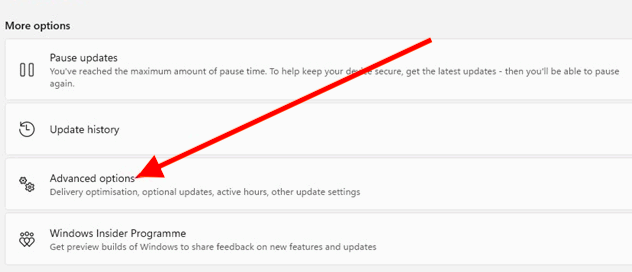
Select the Windows update option from the Settings menu from the left panel, and then click on the Advanced option from the right panel of the same Window.
Step 3: Select Delivery Optimization
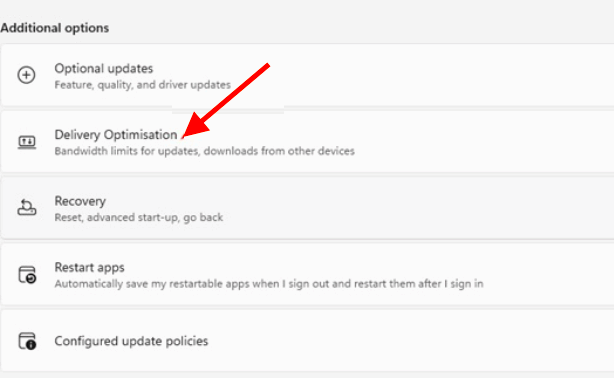
Now, scroll down the given menu to select Additional options, and from there, click on the Delivery Optimization option.
Step 4: Disable the Option
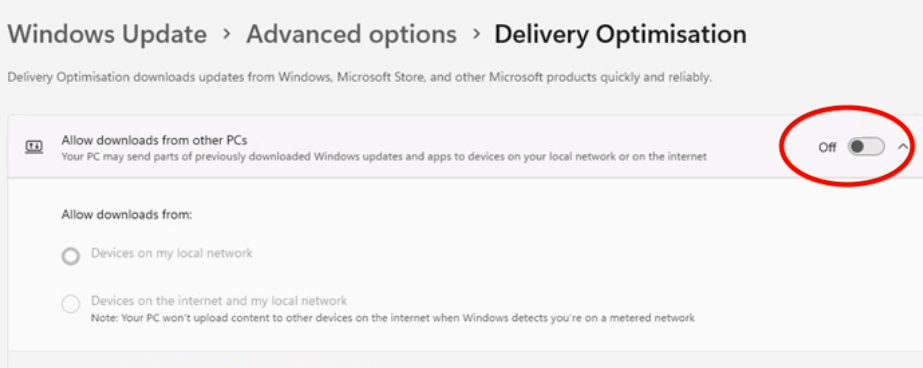
Here, from the given option- “Allow downloads from other PCs” with a toggle button, just click on the Toggle button- this way, you can disable this option.
Method 2: Disable dosvc via Registry Editor
If you cannot see the Delivery Optimization option, or if the option is greyed out and non-clickable, you can simply use the Registry Editor to disable this option.
Step 1: Start the Run dialog box
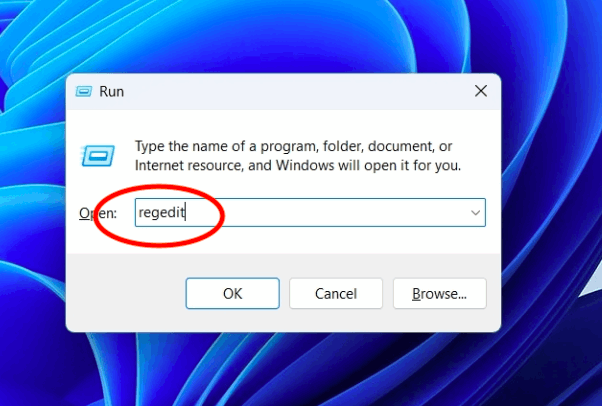
Press Windows + R keys together to open Run box.
Step 2: Open Registry Editor
In the search box of the Run dialog, type in regedit and press the Enter button.
Step 3: Enter the given path
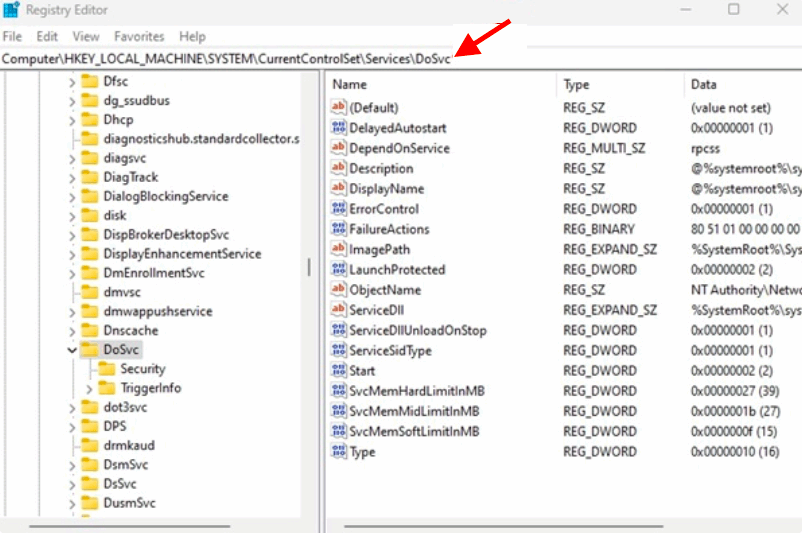
Copy and paste the path given below:
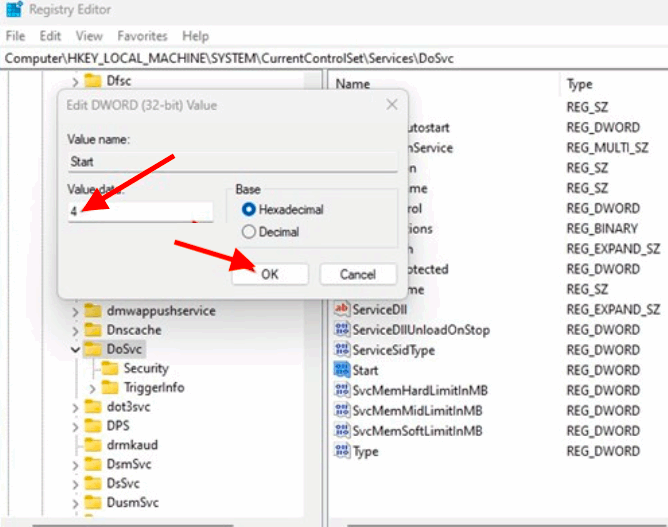
“Computer\HKEY_LOCAL_MACHINE\SYSTEM\CurrentControlSet\Services\DoSvc”
Step 4: Locate the Start option
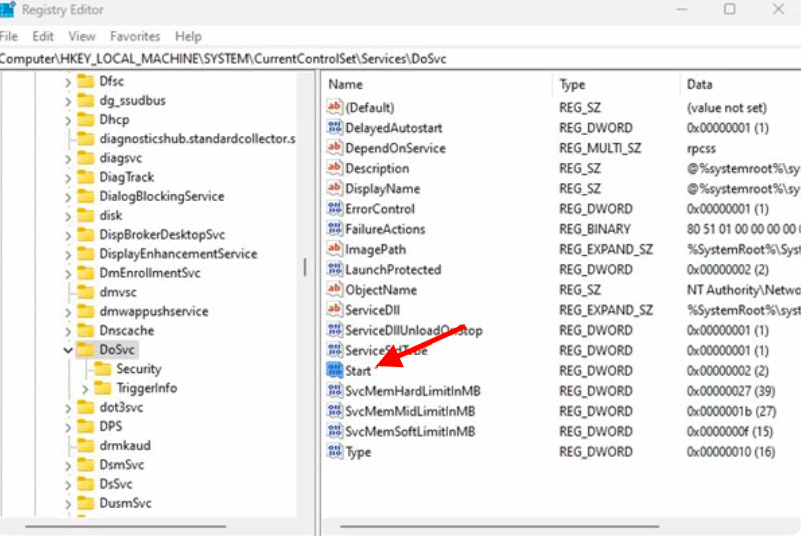
From the given path, locate the Start option from the right panel and right-click on it. Click the Modify button to change its value.
Step 5: Change the Value Data
As you click the Modify button, you will see a new Window where you can change the Hexadecimal Value Data. Enter 4 in the value data option and click the OK button.
Step 6: Close the Window
Now, close the Registry Editor window and other Windows to restart your system. Make sure to restart the system to make the changes effective on the PC.
You have successfully disabled the Delivery Optimization option from the Windows system using the Registry Editor.
Method 3: Disable dosvc via Local Group Policy Editor
Users can configure many settings and applications of their PC system using the Local Group Policy Editor tool which is an important tool for all Windows users. Just like the Registry Editor, you can use this tool to disable dosvc option from your PC.
Step 1: Start the Run Dialog box
Start the Run Dialog box. Just press the Windows+ R keys to launch it.
Step 2: Open Local Group Policy Editor
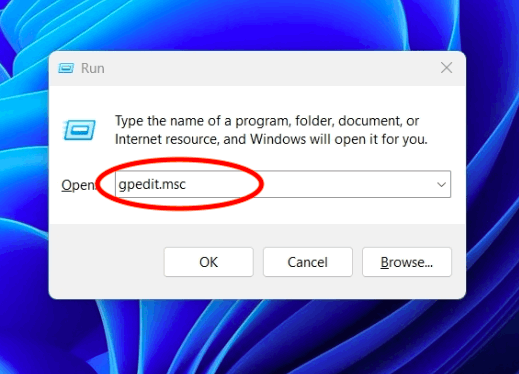
To open the Local Group Policy Editor window, type in gpedit.msc in the search bar of the Run tool. Press the Enter key.
Step 3: Open Windows Component Folder
In the Local Group Policy Editor window, go to the Computer Configuration option, then select the Administrative Templates from there. Click the Windows Comp option to open the Windows Component Folder.

Step 4: Open Delivery Optimization
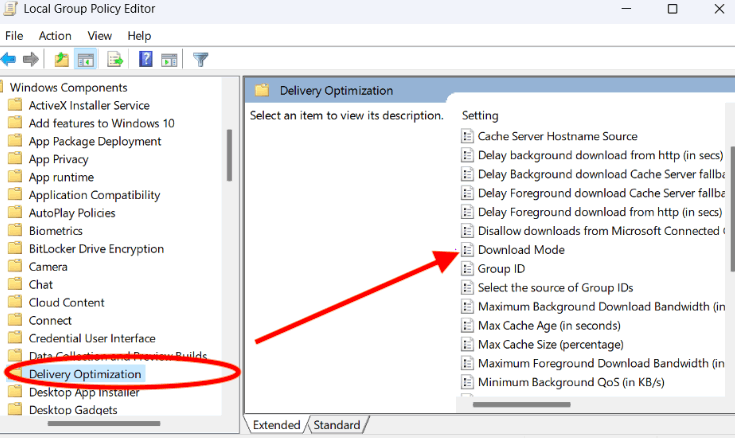
Click the Delivery Optimization option from the left panel and then double-click to the Download Mode option.
Step 5: Make Changes to Download Mode
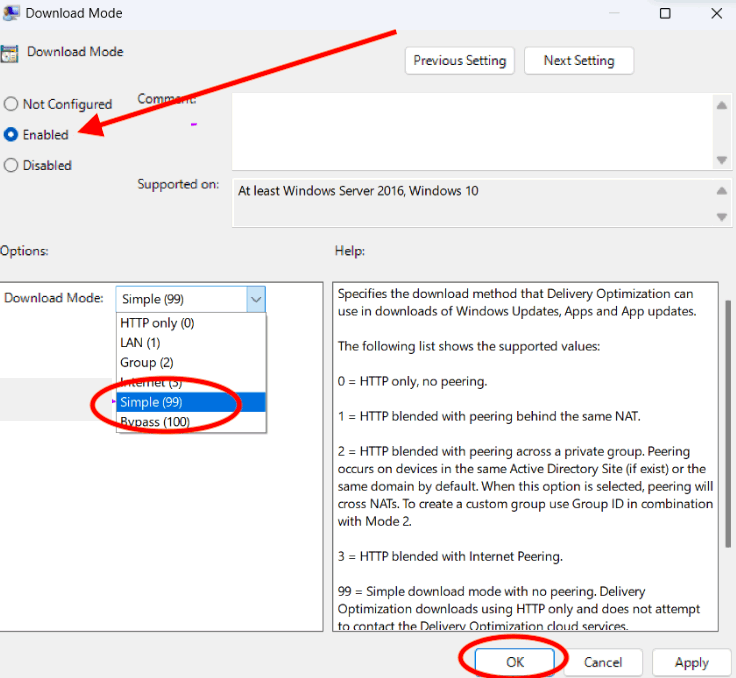
From the Download Mode option, select the Enabled option, open the drop-down menu from the Download Mode box, and select the Simple (99) option. Click the Apply button to save changes and OK button at last.
Step 6: Close the Window
Click the X button to close the Local Group Policy editor.
Step 7: Open Command Prompt
Select the Windows key and open Command Prompt from there. Select the Run as Administrator option.
Step 8: Type a Command
Type this command “gpupdate/force” and press the Enter key.
Step 9: Restart the System
Now, close down the Window and restart your system to make changes.
By doing this, Delivery Optimization will stop using Delivery Optimization cloud services. It will start using HTTP that reduces data usage itself and that’s how you can disable dosvc on Windows 11 using the Local Group Policy Editor window.
Method 4: Disable doscv by enabling Metered Connection
Step 1: Open the Settings app
Press the Windows+ I key together to open the Settings app on your computer system.
Step 2: Select Network & Internet option
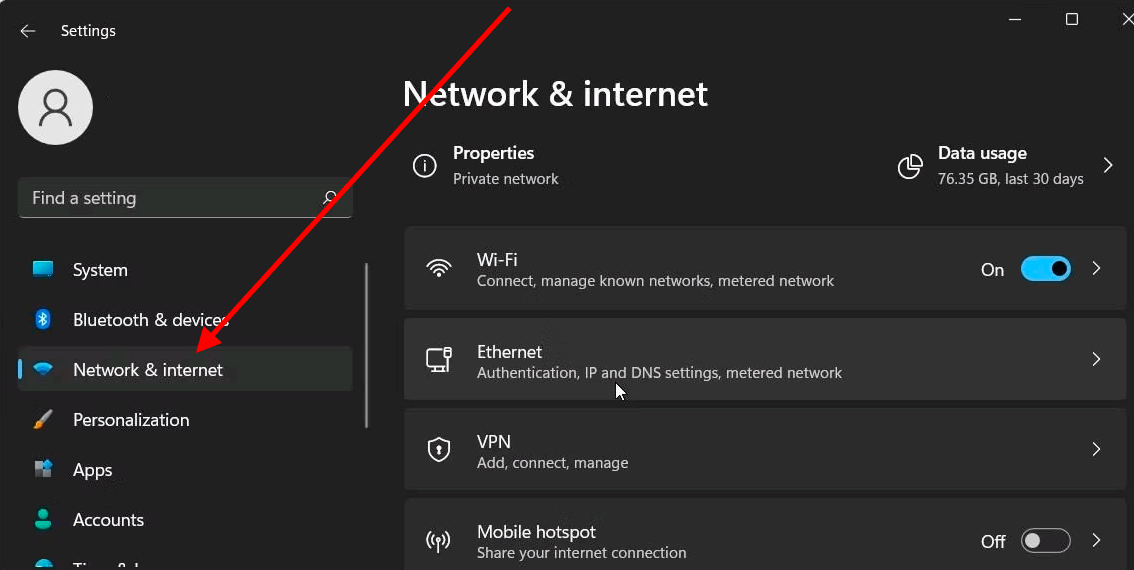
From the Settings Window, select the Network & Internet option from the left panel. From the right-panel, select the network that you want to metered to disable dosvc in Windows 11 system.
Step 3: Enable Metered Connection
From the Network & Internet option, select the Ethernet option to open Authentication Settings. Here, you can see the Metered Connection option; select the Toggle button to enable the Metered Connection.

Metered Connection ensures that your Windows system does not use the Delivery Optimization service. When your system stops using the Delivery Optimization service, it will not use the same service to download and upload files.
Method 5: Disable doscv in Windows 11 using the Services App
Windows 11 comes with yet another useful app called Services app to stop, start, and configure many services that you use on your computer system. You can use the same Services app to disable dosvc tool from your Windows 11 system.
Step 1: Start the Run dialog box
Just press the Windows Key and R key to launch the Run Dialog box.
Step 2: Open the Services app
Type in services.msc in the Search box of the Run dialog box and then press the Enter button.
Step 3: Select Delivery Optimization
You will see a list of services that are available for you to use on your PC system. Locate the Delivery Optimization service from the given list and double-click on that option.
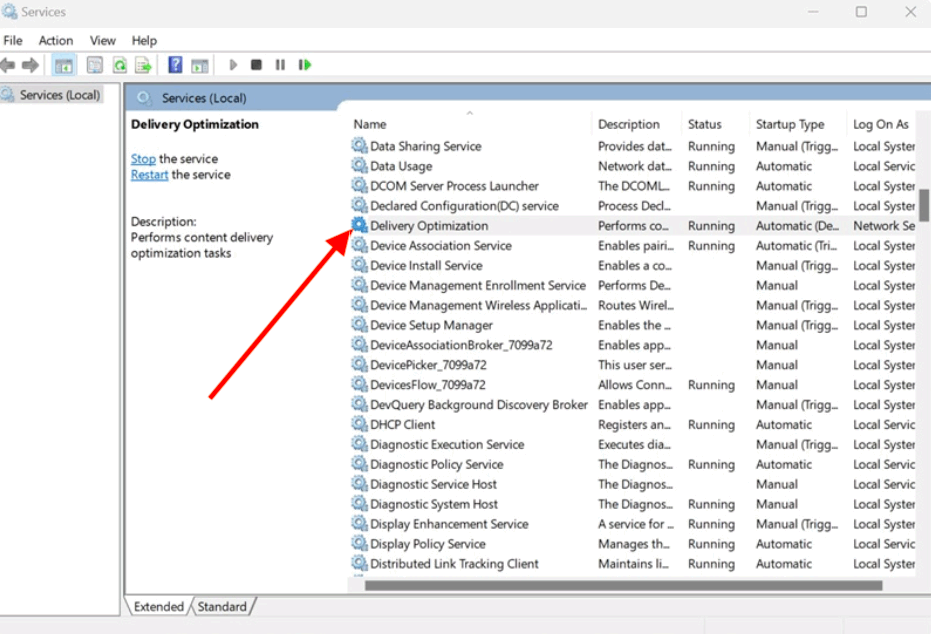
Step 4: Disable Startup Type
From the Delivery Optimization Properties, select the Startup Type option, click the drop-down button, and then set it to Disabled.
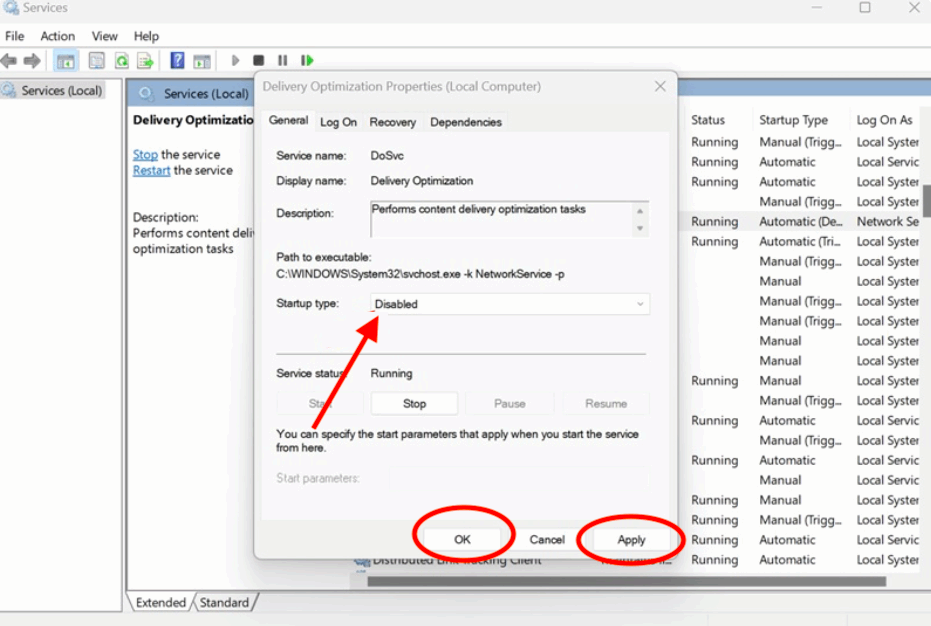
Step 5: Make Changes
Last, click the Apply button and then OK button to make changes and close the current Window.
Step 6: Restart the System
Once done, restart your system. When you restart the system, the recently made changes will come into effect.
These were all the working methods that you can use to disable dosvc in Windows 11. You can try out any of them to disable this service, which can reduce data usage and also speed up your productivity.
